Glass Mapper handles mapping of almost all Sitecore field types to your models, but I discovered one Sitecore field type that Glass Mapper can handle that isn't well documented: the Rules field type. If you haven't worked with the Sitecore Rules field type before, Jeff Darchuk has an excellent blog post about the Sitecore rules API that I recommend reading.
In this post I'll show you how you can use Glass Mapper to map your Rules fields to your models in code.
Add a Rules Field to Your Template
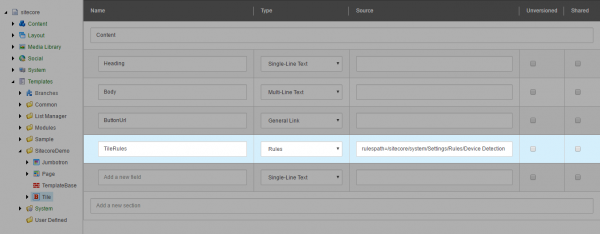
Add a field of type Rules to one of your templates as I've done above. The Source field takes two parameters: rulespath and hideactions.
For the rulespath parameter, you specify the path or item ID of one of the Rules Context Folders found at /sitecore/system/Settings/Rules. If you do not specify a rulespath, your Rules field will not have any conditions or actions to select.
The hideactions parameter is optional, and if you specify hideactions=true, then only conditions will be displayed in your Rules field; actions will be hidden.
For example, if you only want the conditions (and not the actions) from the Device Detection Rules Context Folder, you would specify rulespath=/sitecore/system/Settings/Rules/Device Detection&hideactions=true in the Source field.
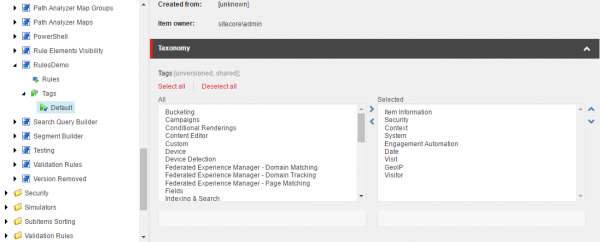
You can easily create your own Rules Context Folder by duplicating one of the folders found at /sitecore/system/Settings/Rules. The Default item nested under the Tags item under each Rules Context Folder has a Tags field that contains a list of all rules tags associated with that Rules Context Folder. You can customize what rules will show up in your Rules field by adding/removing tags from this Tags field.
Add a Rules Property to your Model Class
The next step is to add a new property to your model class for your Rules field, but there are a few things to note before adding the property. Glass Mapper maps Rules fields to the generic RuleList<T> class; there is no non-generic RuleList<T> class takes a RuleContext as its type parameter. In the Sitecore.Kernel assembly, there are six different classes that extend RuleContext:
ConditionalRenderingsRuleContextContentEditorWarningsRuleContextDeviceRuleContextInsertOptionsRuleContextRulesElementVisibilityRuleContextValidatorsRuleContext
The Sitecore.Analytics and Sitecore.ContentSearch assemblies also have classes that extend RuleContext, which you can explore yourself with JetBrains dotPeek. To execute your rules from your model, you must make sure that your RuleList<T> property is specified with the correct RuleContext type parameter, otherwise some or all of the conditions for your Rules field will not load. For example, if you specify your property as RuleList<RuleContext> and some of the rules in your field require DeviceRuleContext, the condition for those rules won't load and those rules will not yield correct results. Jeff Darchuk covers this in his blog post as well.
For this post I will be demonstrating a device rule, so I've added the TileRules property as type RuleList<DeviceRuleContext> to my model class as seen below:
using Glass.Mapper.Sc.Configuration.Attributes;
using Glass.Mapper.Sc.Fields;
using Sitecore.Rules;
using Sitecore.Rules.Devices;

namespace SitecoreDemo
{
  [SitecoreType(TemplateName = "Tile", AutoMap = true)]
  public interface ITile
  {
    string Heading { get; set; }
    string Body { get; set; }
    Link ButtonUrl { get; set; }
    RuleList<DeviceRuleContext> TileRules { get; set; }
  }
}
I'm using interfaces for my models, but this will work just as well with concrete classes.
Add a Rule to Your Item in Sitecore
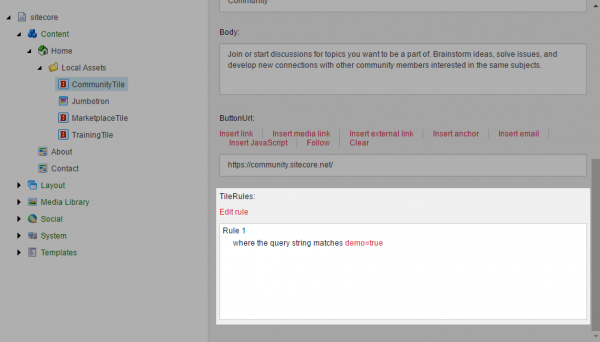
Here I've added one rule to my TileRules field to check if the query string is demo=true. I didn't add any actions, because I'll take my own action in my controller based on the results of the field.
Use the Rules
Here is an extension method I wrote for the RuleList<T> type to evaluate all of the rules in a rule list and return true if any of them evaluate to true; otherwise return false.
using System;
using Sitecore.Rules;

namespace SitecoreDemo
{
  public static class RuleListExtensions
  {
    public static bool EvaluateRules<T>(this RuleList<T> ruleList, T ruleContext)
      where T : RuleContext
    {
      if (ruleList == null) throw new ArgumentNullException(nameof(ruleList));
      if (ruleContext == null) throw new ArgumentNullException(nameof(ruleContext));
      if (ruleContext.IsAborted || ruleList.Count == 0) return false;

      foreach (var rule in ruleList.Rules)
      {
        if (rule.Condition == null) continue;
        var result = rule.Evaluate(ruleContext);
        if (ruleContext.IsAborted) return false;
        if (result) return true;
      }
      return false;
    }
  }
}
In my controller, I first create the DeviceRuleContext from Sitecore.Context.Device and the controller's HttpContext property. I then pass the DeviceRuleContext into the extension method above to evaluate the rules in my tile's TileRules field. I set the header of the tile component to The rules are True! if the rules evaluate to true, and The rules are False! if the rules evaluate to false.
using System.Web.Mvc;
using Glass.Mapper.Sc.Web.Mvc;
using Sitecore.Rules.Devices;

namespace SitecoreDemo.Controllers
{
  public class TileController : GlassController<ITile>
  {
    public ActionResult Tile()
    {
      var ruleContext = new DeviceRuleContext(Sitecore.Context.Device, HttpContext);
      var ruleResult = DataSource.TileRules.EvaluateRules(ruleContext);

      var model = new TileViewModel
      {
        Heading = $"The rules are {ruleResult}!",
        Body = DataSource.Body,
        ButtonText = DataSource.ButtonUrl.Text,
        ButtonUrl = DataSource.ButtonUrl.Url
      };
      return View(model);
    }
  }
}
Now when I navigate to a page with my Tile components, the header is The rules are False! when there is no query string.
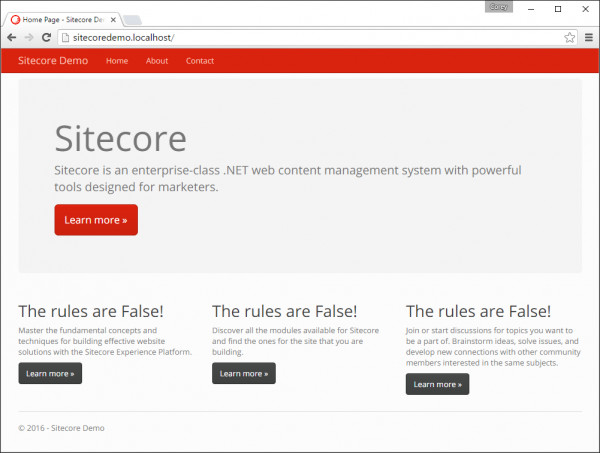
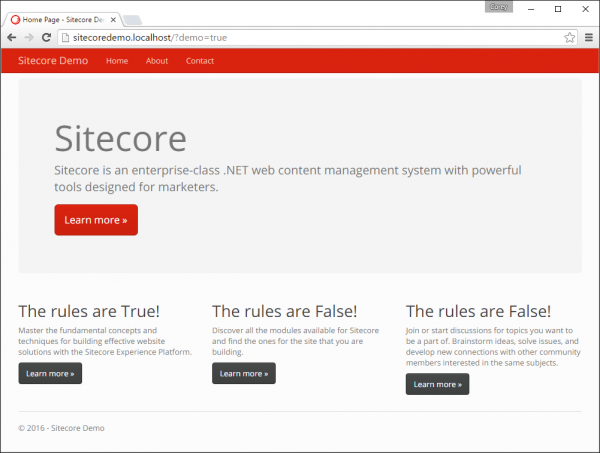
When I navigate to a page with demo=true as the query string, the Tile item that I added the rule to has The rules are True! as its header.
Final Thoughts
Sitecore's rule engine lets you do a lot of cool stuff in your projects and Glass Mapper removes a lot of the ceremony involved in working with rules. Let me know your thoughts or how you use rules in the comments.
