
Google and the web community are pushing HTTPS harder than ever before--Google's boosting search rankings that use HTTPS, and the latest update to Chrome made the HTTPS padlock even more apparent in the address bar.

In the past the only way to get an SSL certificate for your site was to shell out some money, but just last year Let's Encrypt launched to bring free SSL certificates to the web, and they are backed by some pretty big names in the tech world. At this point, there's no excuse not to hop on the bandwagon.
In my last post I went into detail about how to set up a Ghost blog on Azure. In this post, I'll pick up where we left off and show you how to add a Let's Encrypt certificate to your blog so you too can have that sexy badge in Chrome. However, be warned, this isn't a fast or easy process--you may want to get some coffee or tea before you proceed.
Configure Custom Domain
If you have custom domain(s), open the Custom Domain tab for your Web App and follow the instructions to add all of the domains for which you want to use HTTPS. After you've added your custom domain(s), open the Application settings section for your Web App and set the websiteUrl setting to your custom domain, e.g., http://www.coreysmith.co (don't forget http://).
If you don't have a custom domain for your site, there's no point in proceeding. By default Azure provides an SSL certificate for every App Service. You can make use of it by navigating to https://webappname.azurewebsites.net. To force your Ghost blog to always use HTTPS, update the setting websiteUrl to https://webappname.azurewebsites.net and add a setting called websiteUrlSSL set to https://webappname.azurewebsites.net (don't forget https://). You're all done!
Gather Some Information
The first thing we have to do is gather some information about the Web App to which you will be adding a Let's Encrypt certificate. Jot down these values as we go along as you'll need them to set up the Let's Encrypt site extension.
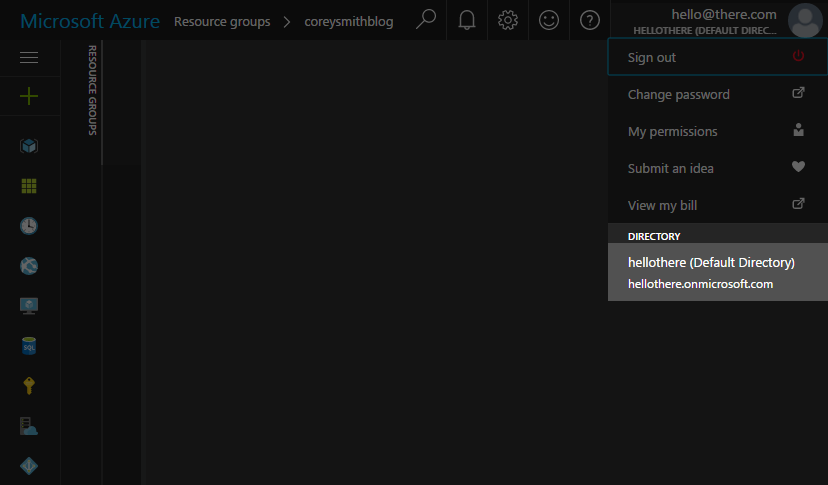
Tenant
This is the account your Ghost Web App lives under. You can find this by clicking on your email address in the top right of the Azure Portal. Your tenant will be something like myaccount.onmicrosoft.com. Mine is pictured below as hellothere.onmicrosoft.com.
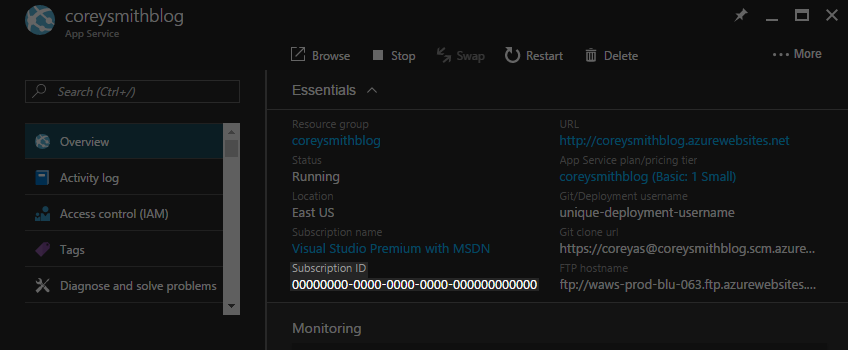
Subscription ID
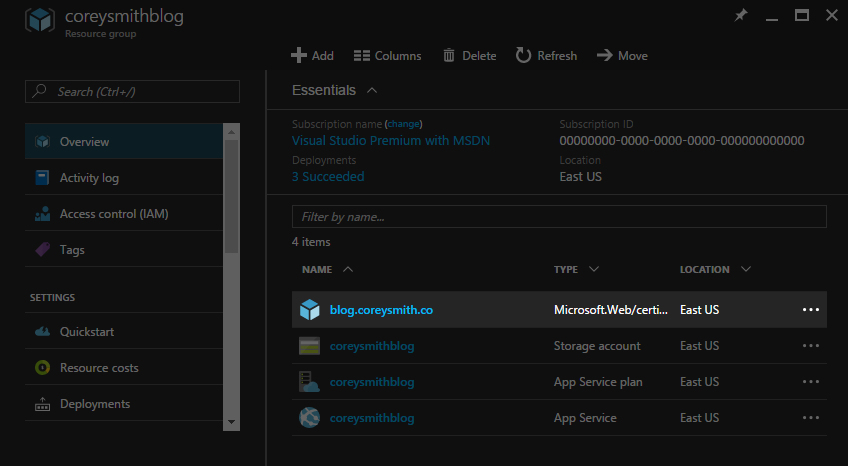
This is the Azure subscription your Ghost Web App is associated with. Open your Web App and your Subscription ID is a GUID displayed at the top of the Overview tab. Mine is pictured below as 00000000-0000-0000-0000-000000000000.
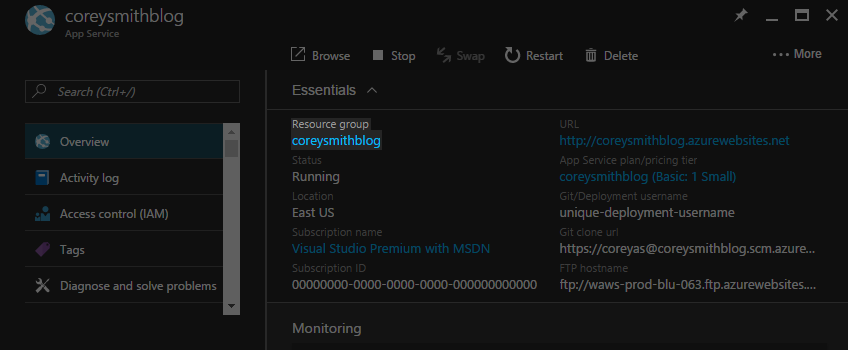
Resource Group Name
This is the Resource Group that your Web App is nested under. This is listed on the Overview tab for your Web App. Mine is pictured below as coreysmithblog.
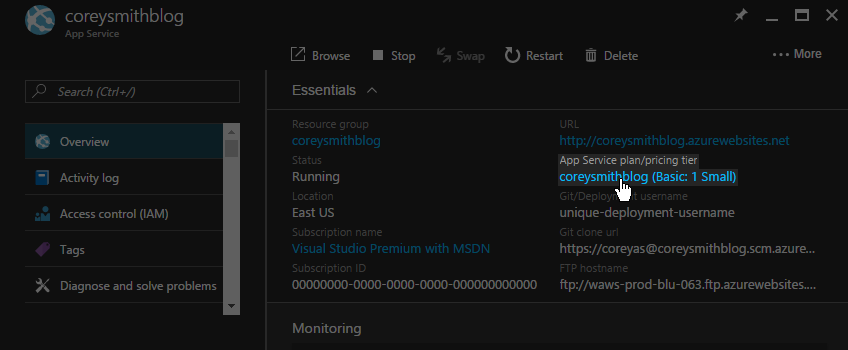
Service Plan Resource Group Name
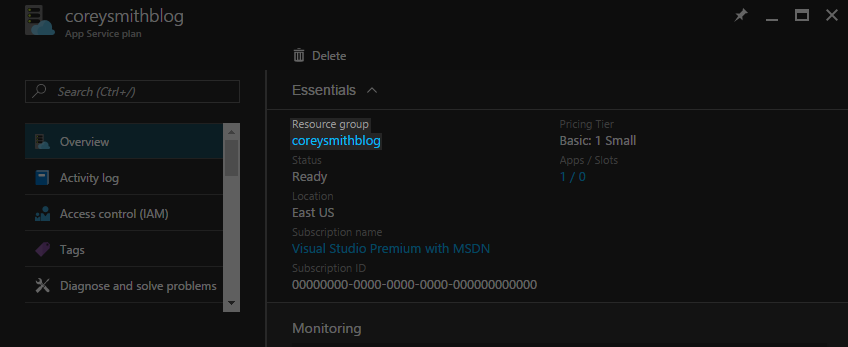
If you followed along with my blog post for setting up Ghost on Azure, this will be the same as the Resource Group above. To double check, click on the App Service plan/pricing tier shown in the Overview tab for your Web App. Mine is pictured below as coreysmithblog (Basic: 1 Small).
This will open the Overview tab for your Web App's App Service Plan. The Resource Group is displayed at the top. Mine is pictured below as coreysmithblog--my Web App and its App Service Plan are both in the same resource group. This is the value you will need later on.
Create Storage Account
The Let's Encrypt site extension needs a Storage Account for logging. It installs a WebJob into your App Service that will automatically renew your Let's Encrypt certificate before it expires; the WebJob will write logs to the Storage Account we're going to create.
Click the big + in the left-hand sidebar of the Azure Portal and search for storage account in the search box. Click Create.
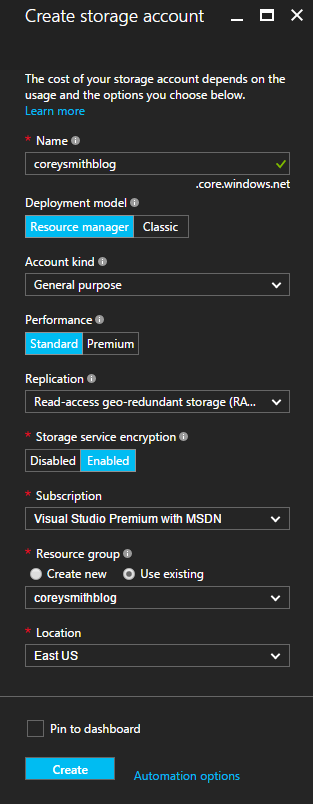
Enter a name for the Storage Account, like firstlastblog as I have below. Select Resource manager for Deployment model and General purpose for Account kind. Select Standard for Performance and Read-access geo-redundant storage for Replication. Select Enabled for Storage service encryption and select your Azure subscription for Subscription. For Resource group, select the Resource Group that your Web App belongs to. For Location, select the location you use for your Web App.
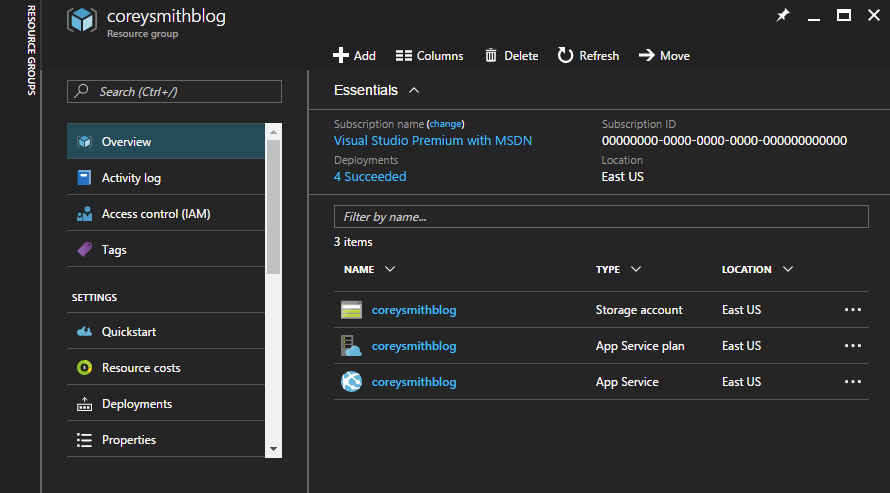
The Storage Account may take a moment to be created. Once it's created, you can find it by clicking Resource Groups in the Azure Portal sidebar and selecting the Resource Group you selected above.
Open your Storage Account and open the Access keys tab. Copy your Storage account name and key1 or key2 (doesn't matter which), into the following connection string:
DefaultEndpointsProtocol=https;AccountName=STORAGEACCOUNTNAME;AccountKey=STORAGEACCOUNTKEY

I will use key1 above so my connection string is the following:
DefaultEndpointsProtocol=https;AccountName=coreysmithblog;AccountKey=WS+HWTTvHx7Mxm6ADZ6qYXPX1JymsR7xxyx+goYfLhCE5bL7KqAe1W7+OQ/d7eXzvJ0t2fgdslK4m8yuiqscRg==
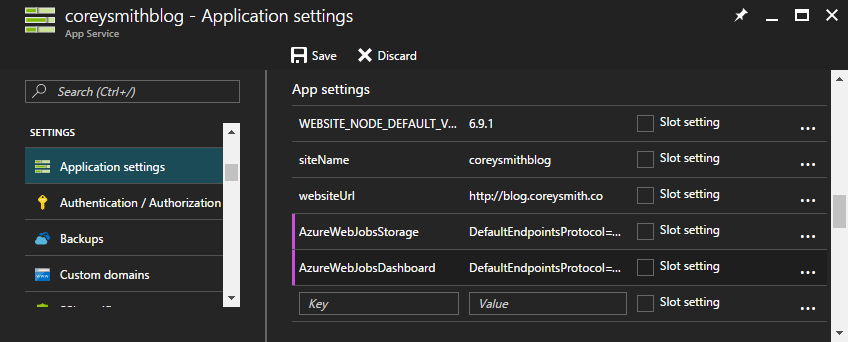
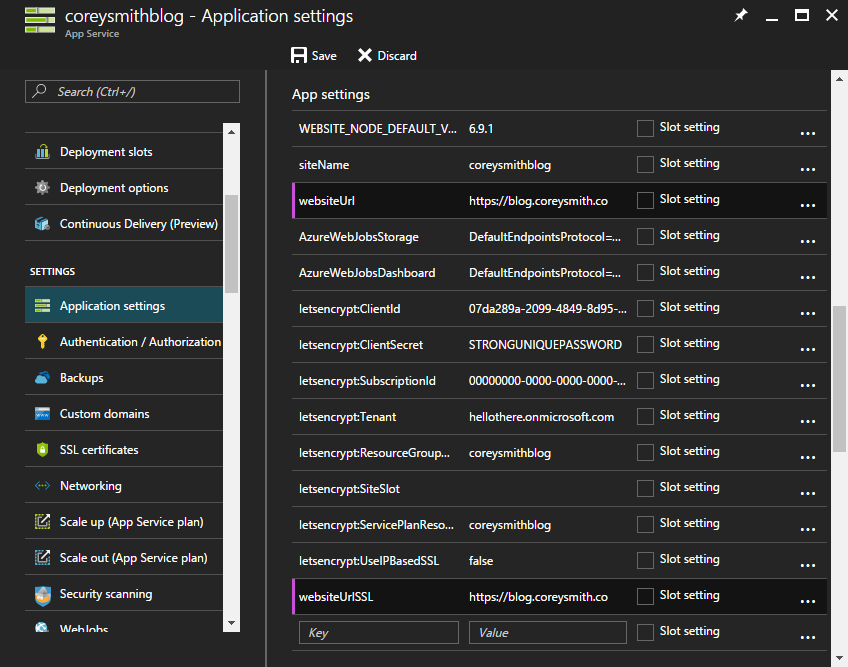
Now open up your Web App and open the Application settings tab. Add two new App settings: AzureWebJobsStorage and AzureWebJobsDashboard. Set the value of both of these settings to your Storage Account's connection string as I have done below.
Create Service Principal
This is the hairiest part of the whole process, but this is something you'll only have to do once, even if you want to use Let's Encrypt for other Web Apps in the future. While it's possible to do this in the Azure Portal, it's significantly easier to do it with PowerShell.
If you want to stick to the Azure Portal, the process is described here. Name your App Registration something like LetsEncrypt, and set the Sign-on URL to something unique (e.g., http://hellothere.onmicrosoft.com/letsencrypt). Assign the role as Contributor instead of Reader. The Application ID for your App Registration is going to be your ClientId later on, and the key you generate will be your ClientSecret, so make note of both of these.
If you don't have Azure PowerShell installed, you can download it from Microsoft here. Once you've got it installed, save the following script to your desktop as a PowerShell file (.ps1), e.g., CreateContributorPrincipal.ps1. This is a modified version of Microsoft's SPNCreation.ps1 script.
Run the script from a PowerShell command window as follows:
.\CreateContributorPrincipal.ps1 -tenant hellothere.onmicrosoft.com -subscriptionId {00000000-0000-0000-0000-000000000000} -appDisplayName LetsEncrypt -appPassword STRONGUNIQUEPASSWORD
For the tenant parameter enter the Tenant you took note of above. For the subscriptionId parameter enter the Subscription Id you took note of above. Make sure to put {} around the Subscription Id as I've done above. For the appDisplayName parameter choose a unique display name, such as LetsEncrypt, with no spaces. For the appPassword parameter choose a strong, unique password--do not use your Azure subscription password.
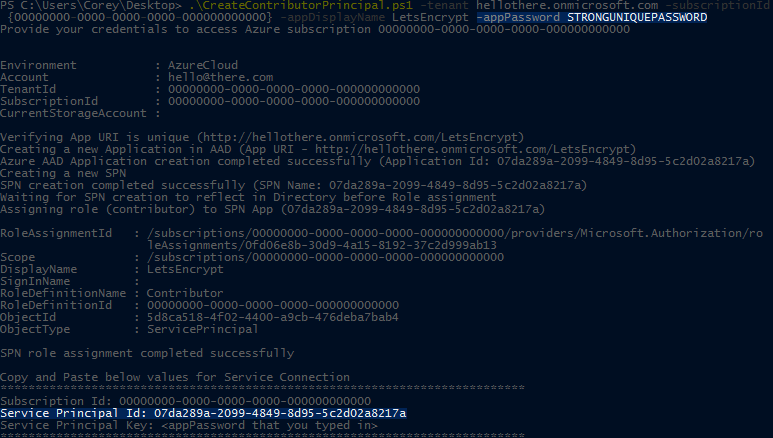
Make note of the appPassword that you used as it will be used later (ClientSecret). Also make note of the Service Principal Id output by the script at the end--it will be used later as well (ClientId).
You can move on to the next section at this point, but I want to point out how to retrieve the ClientId and generate a new ClientSecret through the Azure Portal after you've run the script.
In the Azure Portal sidebar, click on Azure Active Directory and click on the App registrations tab.
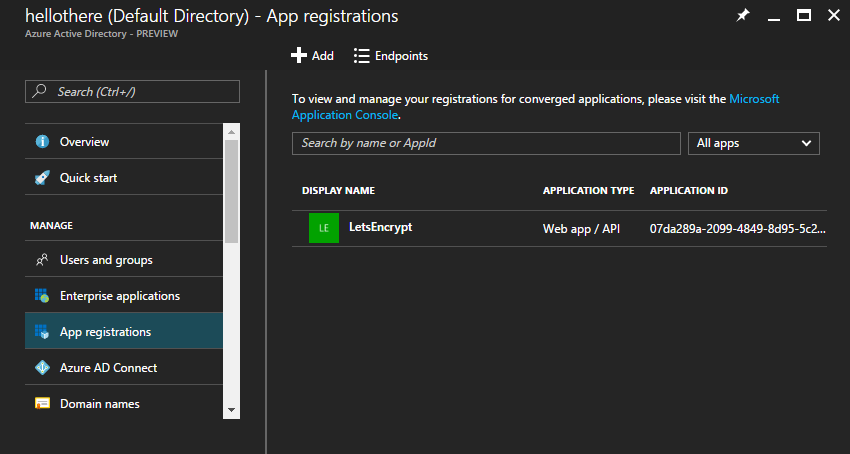
Click on the App Registration with the appDisplayName you entered into the script above.
The ClientId you use for the Let's Encrypt site extension is the Application ID shown on the App Registration overview tab.

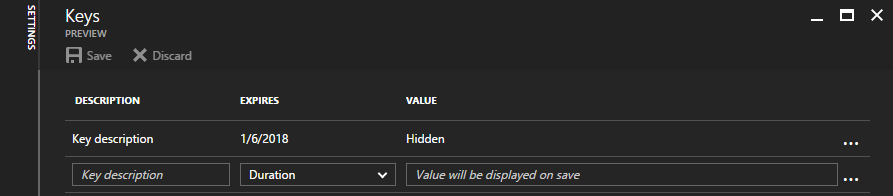
If you click on the Keys tab in the Settings blade, you'll see a key that is hidden. The value of this key is the appPassword you put into the script. You're not able to retrieve its value again, but you can create a new ClientSecret alongside it and use it for the Let's Encrypt site extension without issue.
Update IIS to Serve Let's Encrypt Challenge File
The Let's Encrypt site extension works by creating a challenge file on your Web App that the Let's Encrypt service accesses through your domain, e.g., /, to verify that you are indeed the owner of the domain. Without some extra configuration, your Ghost blog won't serve those files. Let's configure that now.
If you followed along with my previous blog post, Set Up Ghost Blog on Azure, you don't need to do anything. If you didn't, open up your web.config and add the following to the <rules> section above <rule name="StaticContent"> if it's not already there:
<rule name="LetsEncrypt" stopProcessing="true">
  <match url="\.well-known\/acme-challenge\/(.*)" />
  <action type="None" />
</rule>
If you've got Git deployment set up on your Web App, commit your changes and push to Azure through your favorite Git client; otherwise, publish through your deployment process.
git push azure
Install the Let's Encrypt Site Extension
Log in to your Web App's Kudu service site at webappname.scm.azurewebsites.net. Click on the Site extensions link in the top navigation, click the Gallery tab, and search for lets encrypt.
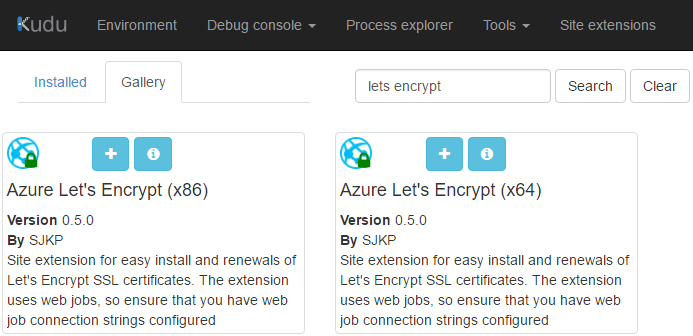
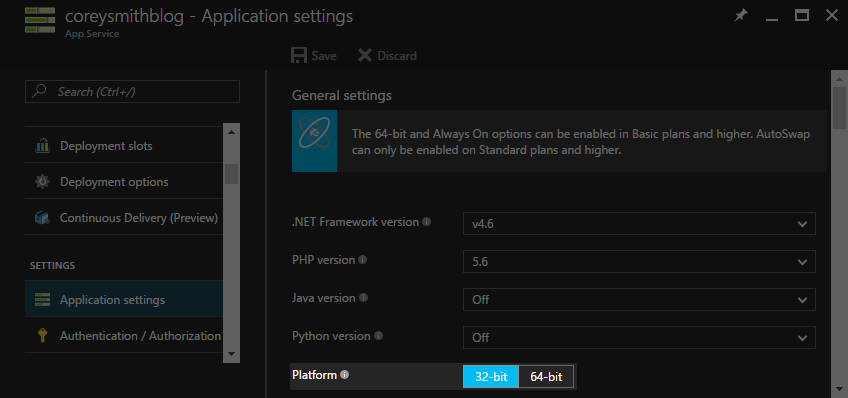
If your Web App is running on the 32-bit platform, click the + button on Azure Let's Encrypt (x86), otherwise install Azure Let's Encrypt (x64). Don't install both.
You can quickly check your Web App's platform by opening your Web App in the Azure Portal and looking at the Platform setting in the Application settings tab.
Once the Let's Encrypt site extension has installed, open up your Web App in the Azure Portal and restart your Web App by clicking Stop, waiting a good 5 seconds or so, and then clicking Start. Restart is not adequate--you must Stop, wait, and Start your Web App.
Configure the Let's Encrypt Site Extension
All of those values I've had you keep track of from the beginning of this post are finally going to be used! Open up the Let's Encrypt site extension, scroll down to the Automated Installation section and fill it out. Make sure to check Update Application Settings before you click Next.
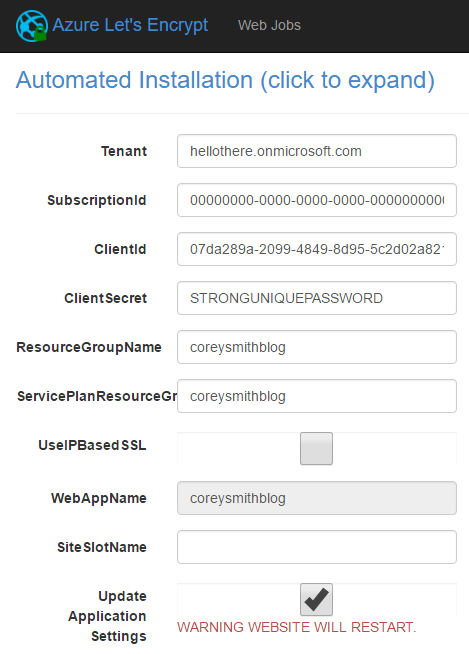
Tenant: the Tenant you took note of at the beginning of this post.SubscriptionId: the Subscription Id you took note of at the beginning of this post.ClientId: theService Principal Idoutput by theCreateContributorPrincipal.ps1script.ClientSecret: theappPasswordparameter you input into theCreateContributorPrincipal.ps1script.ResourceGroupName: the Resource Group Name you took note of at the beginning of this post.ServicePlanResourceGroupName: the Service Plan Resource Group Name you took note of at the beginning of this post.UseIPBasedSSL: leave unchecked unless you know you need it.SiteSlotName: leave blank unless you're using deployment slots.UpdateApplicationSettings: check.
After carefully filling out these fields, click Next. If you get the following exception, hit the back button and click Next again.
'authority' Uri should have at least one segment in the path (i.e.
https://host/path/)
Parameter name: authority
Click Next on the Custom Domains and SSL page once it loads.
Install Let's Encrypt Certificate(s)
On the Request and Install Certificate page, select the domain for which you want to request an SSL certificate. You can repeat this for each domain you have listed. However, note the text on the page that states you can only request a certificate for each domain 5 times per week; check UseStaging if you want to test the process out.
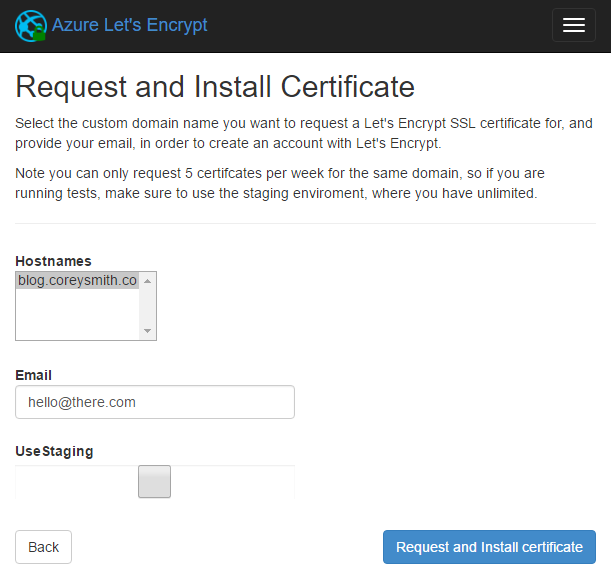
Click Request and Install Certificate. This process isn't instant, so be patient. If an exception occurs, scroll down to the Common Issues section and see if the exception and its solution is listed there.
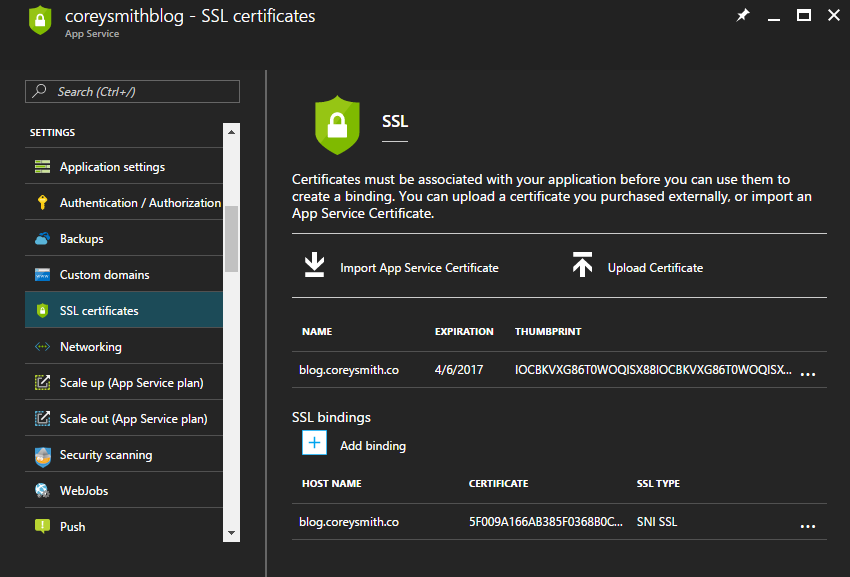
After a short wait, you should be redirected to the Custom Domains and SSL page with the success message Certificate successfully installed. You can see your certificate(s) installed in the Azure Portal in two places: your Web App's Resource Group, and the SSL certificates tab for your Web App.
Notice when you open the SSL certificates section for your Web App that your certificate(s) have already been bound to the appropriate URL(s). If you don't see it, clear cache and refresh the page, or click + Add binding and follow the steps.
Configure Ghost to Use HTTPS
Open the Application settings section for your Web App. Update the websiteUrl setting to your HTTPS URL, e.g., https://www.coreysmith.co (don't forget https://). Add a new setting, websiteUrlSSL, and also set it to your HTTPS URL, e.g., https://www.coreysmith.co (again, don't forget https://). Save your changes.
At last, after all your hard work, you can access your site through HTTPS!!!
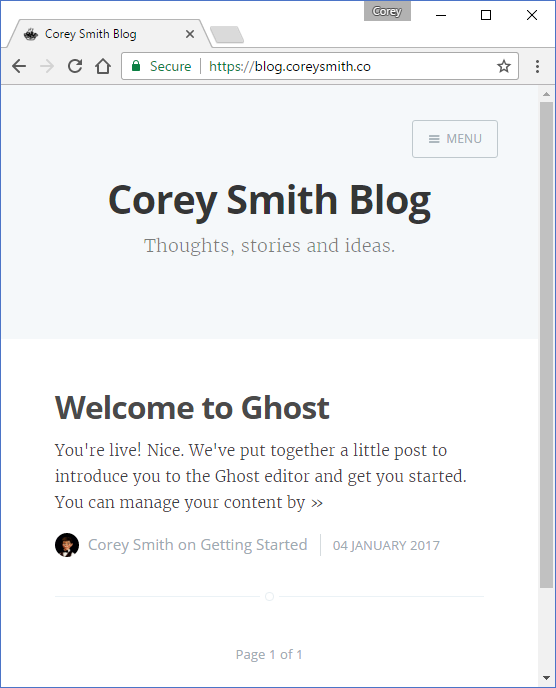
Notice that Ghost will now force HTTPS from any of your domains. For example, if you navigate to http://webappname.azurewebsites.net/ you will get a 301 redirect to https://www.yourdomain.com/. Neat!
Renew Your Certificate
Let's Encrypt certificates are only valid for 3 months. Fortunately, you won't have to go through all of this rigmarole again to renew your certificates. The Let's Encrypt site extension installed a WebJob to your Web App that runs continuously and will automatically renew your certificate before it expires. You'll get reminder emails 19 days, 9 days, and 0 days before your certificate expires, like this:
Hello,
Your certificate (or certificates) for the names listed below will expire in
0 days (on 31 Mar 17 20:49 +0000). Please make sure to renew
your certificate before then, or visitors to your website will encounter errors.
blog.coreysmith.co
You can read more about the reminder emails on the Let's Encrypt page.
The first time my certificates expired, I had two sets of certificates expire on the same day. Both sites configured according to this guide. One site's certificate automatically renewed through the WebJob; the other site's certificate did not. I'm not sure why one site failed to renew its certificate automatically; I had to run the WebJob manually to renew it. I recommend keeping a close eye on your sites around renewal time just to make sure everything goes smoothly.
Common Issues
No route registered for '/letsencrypt/'
If you get this exception when you try to open the Let's Encrypt site extension, open your Web App in the Azure Portal, click Stop, wait about 10 seconds, and click Start. Try again.
Could not load file or assembly 'LetsEncrypt.SiteExtension.Core' or one of its dependencies. An attempt was made to load a program with an incorrect format.
If you get this exception when you try to open the Let's Encrypt site extension, you probably installed Let's Encrypt (x64) when your Web App is running on the 32-bit platform. Uninstall Let's Encrypt (x64) and install Let's Encrypt (x86), or change your platform to 64-bit.
The Lets Encrypt ACME server was probably unable to reach
http://www.yourdomain.com/.well-known/acme-challenge/4jiHgeFDCbaQxrEiNMSBaZY6XWvU2Ts39R1qPoNm1lkview error report from Lets Encrypt athttps://acme.api.letsencrypt.org/acme/authz/aF_GH1-MO9P968qTWxbceGFHEFsTUVa2Ob5LmNo7PQRfor more information
If you get this exception, your Web App is not correctly serving the Let's Encrypt challenge files. Revisit the section above on updating IIS to serve Let's Encrypt challenge files and make sure that you copied the rule properly and put it in the correct place. If you have custom rules added to your web.config, try adding the rule to the top of the rule list.
Conclusion
Holy smokes this was a lot of work, but I warned you 🙂. Hopefully in the near future Microsoft will add first-class support for Let's Encrypt and remove the necessity for this blog post (or at least the majority of it). Until then we can take solace in the fact that the renewal process is automated.
I didn't put together this post in a vacuum--I just filled in some gaps that I felt were missing, ambiguous, or out of date when I was researching this process for myself. I would like to cite the following sites for their guidance:
- Troy Hunt - Everything you need to know about loading a free Let's Encrypt certificate into an Azure website
I hope this post helped you out. Let me know your thoughts in the comments!