Two weeks ago Sitecore launched JavaScript Services Tech Preview 4. With the new release came a seriously awesome new documentation site with instructions on how to get JavaScript Services deployed to Azure. In this post I'll walk you through how to automate that deployment with Azure ARM templates.
Update (November 29, 2018)
JavaScript Services 11 (General Availability) was released yesterday. Sitecore has created web deployment packages that you can download here and ARM templates you can grab here. This post was written for Tech Preview 4, before web deployment packages and ARM templates were available for JSS. Use the official ones going forward.
The official WDPs have an issue creating the JSS import user just like I outlined here; this section will help you fix that.
Create Web Deployment Package (WDP)
Sitecore's ARM templates deploy code and items to web apps through WDPs. Right now JavaScript Services (JSS) is only distributed as a Sitecore package, but the Sitecore Azure Toolkit makes it easy to convert any Sitecore package into a WDP.
Convert JSS Sitecore Package into WDP
Download the latest version of the Sitecore Azure Toolkit (SAT). Extract the contents of the zip to some place with easy access. For this post I'll extract to C:\Sitecore\sat.
Download the latest version of the JavaScript Services Server package. To convert a Sitecore package into a WDP, you just import the SAT module into PowerShell and use the ConvertTo-SCModuleWebDeployPackage commandlet:
# Make sure to import `Sitecore.Cloud.Cmdlets.dll` and not `Sitecore.Cloud.Cmdlets.psm1`
Import-Module C:\Sitecore\sat\tools\Sitecore.Cloud.Cmdlets.dll

$packagePath = "C:\Sitecore\Packages"
ConvertTo-SCModuleWebDeployPackage `
    -Path "$packagePath\Sitecore JavaScript Services Tech Preview Server 9.0.1 rev. 180724.zip" `
    -Destination $packagePath `
    -Verbose `
    -Force
After this you'll have a WDP called Sitecore JavaScript Services Tech Preview Server 9.0.1 rev. 180724.scwdp.zip at the Destination that you can deploy to Azure.
Create Cargo Payload
JSS requires a custom HTTP handler to be added to your Web.config to handle media requests. To do this, we'll create a Sitecore Cargo Payload (SCCPL)[1] with an XDT transform and merge it into the WDP we created above. When the updated WDP gets deployed to Azure, the HTTP handler will get added to the Web.config automatically.
Create a directory with the following folder structure (note: the file names and directory structure under JSSSCCPL must match exactly; you can name the JSSSCCPL directory whatever you like). I'll be creating the directory under C:\Sitecore\Packages.
JSSSCCPL
└── Xdts
    └── web.config.xdt
Paste the following transform into JSSSCCPL\Xdts\web.config.xdt:
<?xml version="1.0"?>
<configuration xmlns:xdt="http://schemas.microsoft.com/XML-Document-Transform">
  <system.webServer>
    <handlers>
      <add verb="*" path="sitecorejss_media.ashx" type="Sitecore.JavaScriptServices.Media.MediaRequestHandler, Sitecore.JavaScriptServices.Media" name="Sitecore.JavaScriptServices.Media.MediaRequestHandler"
           xdt:Transform="InsertIfMissing" xdt:Locator="Match(path)" />
    </handlers>
  </system.webServer>
</configuration>
Now fire up PowerShell to create an SCCPL with the New-SCCargoPayload commandlet:
# Make sure to import `Sitecore.Cloud.Cmdlets.dll` and not `Sitecore.Cloud.Cmdlets.psm1`
Import-Module C:\Sitecore\sat\tools\Sitecore.Cloud.Cmdlets.dll

$packagePath = "C:\Sitecore\Packages"
New-SCCargoPayload `
    -Path "$packagePath\JSSSCCPL" `
    -Destination $packagePath `
    -Verbose `
    -Force
Now you'll have an SCCPL called JSSSCCPL.sccpl at the Destination.
⚠️WARNING⚠️: If you deploy the Sitecore Web.config as part of your solution, make sure you have a process in place to add this HTTP handler into your Web.config so it isn't lost on deploy.
Merge SCCPL into WDP
Next step is to merge the SCCPL we just created into the WDP. This is done with the Update-SCWebDeployPackage commandlet:
# Make sure to import `Sitecore.Cloud.Cmdlets.dll` and not `Sitecore.Cloud.Cmdlets.psm1`
Import-Module C:\Sitecore\sat\tools\Sitecore.Cloud.Cmdlets.dll

$packagePath = "C:\Sitecore\Packages"
Update-SCWebDeployPackage `
    -EmbedCargoPayloadPath "$packagePath\JSSSCCPL.sccpl" `
    -Path "$packagePath\Sitecore JavaScript Services Tech Preview Server 9.0.1 rev. 180724.scwdp.zip" `
    -Verbose
After that if you peek inside of Sitecore JavaScript Services Tech Preview Server 9.0.1 rev. 180724.scwdp.zip you'll notice that the SCCPL we created is now embedded under \Content\Website\App_Data\Transforms. Now the Sitecore Bootloader Module will take care of applying the XDT transform when the WDP is installed in Azure.
See the Sitecore Web Deploy Documentation on how you can pipe all these commands together into a nice script.
⚠️WARNING⚠️: If you are using the XP Scaled templates, you'll need to make a CD-specific WDP for the CD web apps since CDs only need the JSS files, not the items. Check out this gist on GitHub for how to remove database operations from a WDP.
Upload the JSS WDP to a Public URL
Your web deploy package is all good to go. At this point you just need to upload it to a public URL, preferrably an Azure Storage Account in the same region you'll deploy your Sitecore environment. Make note of the URL as you'll need it later.
Upload the Bootloader WDP to a Public URL
There is a WDP for the Sitecore Bootloader Module that you'll need to make publicly available as well. Grab it out of the Sitecore Azure Toolkit at \resources\9.0.2\Addons\Sitecore.Cloud.Integration.Bootload.wdp.zip and upload it to the same place you uploaded the JSS WDP. Make note of the URL as you'll need it later.
Create JavaScript Services Add-on ARM Template
Sitecore publishes some great ARM templates on GitHub to make it easy for you to deploy Sitecore to Azure. For this post I'll be working with the Sitecore 9.0.2 XP Single templates. If you are working with the XP Scaled templates, pay special attention to the ⚠️WARNING⚠️ sections.
If you've gotten to this point but haven't deployed to Azure with ARM templates before, stop. Go follow along with Sitecore MVP Pete "Sitecore Hacker" Navarra's guide to deploying Sitecore to Azure PaaS and come back once you've deployed to Azure successfully. His guide is top notch and will get you familiar with the process quickly.
Create JSS Add-on ARM Template
The Sitecore ARM templates are architected nicely so that you don't even have to modify the templates that Sitecore publishes to deploy custom modules. Check out Sitecore's nice documentation on how this works.
Create a file called sitecore-module.json with the following contents:
{
  "$schema": "http://schema.management.azure.com/schemas/2015-01-01/deploymentTemplate.json#",
  "contentVersion": "1.0.0.0",
  "variables": {
    "webApiVersion": "2016-08-01",
    "resourcesApiVersion": "2016-09-01",
    "sqlServerFqdnTidy": "[toLower(trim(parameters('sqlServerFqdn')))]",
    "coreSqlDatabaseNameTidy": "[toLower(trim(parameters('coreSqlDatabaseName')))]",
    "masterSqlDatabaseNameTidy": "[toLower(trim(parameters('masterSqlDatabaseName')))]",
    "singleWebAppNameTidy": "[toLower(trim(parameters('singleWebAppName')))]"
  },
  "parameters": {
    "standard": {
      "type": "secureObject",
      "defaultValue": {
        "infrastructure": {
          "sqlServerFqdn": null
        },
        "deploymentId": null,
        "location": null,
        "sqlServerLogin": null,
        "sqlServerPassword": null,
        "coreSqlDatabaseName": null,
        "masterSqlDatabaseName": null,
        "singleWebAppName": null
      }
    },
    "extension": {
      "type": "secureObject",
      "defaultValue": {
        "msDeployPackageUrl": null
      }
    },

    "templateLinkBase": {
      "type": "string",
      "minLength": 1,
      "defaultValue": "[uri(replace(json(string(deployment().properties.templateLink)).uri,' ','%20'), '.')]"
    },

    "deploymentId": {
      "type": "string",
      "defaultValue": "[coalesce(parameters('standard').deploymentId, resourceGroup().name)]"
    },
    "location": {
      "type": "string",
      "minLength": 1,
      "defaultValue": "[coalesce(parameters('standard').location, resourceGroup().location)]"
    },

    "sqlServerFqdn": {
      "type": "string",
      "minLength": 1,
      "defaultValue": "[coalesce(parameters('standard').infrastructure.sqlServerFqdn, concat(parameters('deploymentId'), '-sql.database.windows.net'))]"
    },
    "sqlServerLogin": {
      "type": "string",
      "minLength": 1,
      "defaultValue": "[parameters('standard').sqlServerLogin]"
    },
    "sqlServerPassword": {
      "type": "securestring",
      "minLength": 8,
      "defaultValue": "[parameters('standard').sqlServerPassword]"
    },

    "coreSqlDatabaseName": {
      "type": "string",
      "minLength": 1,
      "defaultValue": "[coalesce(parameters('standard').coreSqlDatabaseName, concat(parameters('deploymentId'), '-core-db'))]"
    },
    "masterSqlDatabaseName": {
      "type": "string",
      "minLength": 1,
      "defaultValue": "[coalesce(parameters('standard').masterSqlDatabaseName, concat(parameters('deploymentId'), '-master-db'))]"
    },

    "singleWebAppName": {
      "type": "string",
      "minLength": 1,
      "defaultValue": "[coalesce(parameters('standard').singleWebAppName, concat(parameters('deploymentId'), '-single'))]"
    },
    "msDeployPackageUrl": {
      "type": "securestring",
      "minLength": 1,
      "defaultValue": "[parameters('extension').msDeployPackageUrl]"
    }
  },

  "resources": [
    {
      "name": "[concat(variables('singleWebAppNameTidy'), '/', 'MSDeploy')]",
      "type": "Microsoft.Web/sites/extensions",
      "location": "[parameters('location')]",
      "apiVersion": "[variables('webApiVersion')]",
      "properties": {
        "mode": "Incremental",
        "addOnPackages": [
           {
            "packageUri": "[parameters('msDeployPackageUrl')]",
            "dbType": "SQL",
            "connectionString": "[concat('Data Source=tcp:', variables('sqlServerFqdnTidy'), ',1433;Initial Catalog=master;User Id=', parameters('sqlServerLogin'), ';Password=', parameters('sqlServerPassword'), ';')]",
            "setParameters": {
              "Application Path": "[variables('singleWebAppNameTidy')]",
              "Core Admin Connection String": "[concat('Encrypt=True;TrustServerCertificate=False;Data Source=', variables('sqlServerFqdnTidy'), ',1433;Initial Catalog=',variables('coreSqlDatabaseNameTidy'),';User Id=', parameters('sqlServerLogin'), ';Password=', parameters('sqlServerPassword'), ';')]",
              "Master Admin Connection String": "[concat('Encrypt=True;TrustServerCertificate=False;Data Source=', variables('sqlServerFqdnTidy'), ',1433;Initial Catalog=',variables('masterSqlDatabaseNameTidy'),';User Id=', parameters('sqlServerLogin'), ';Password=', parameters('sqlServerPassword'), ';')]"
            }
          }
        ]
      }
    }
  ]
}
⚠️WARNING⚠️: If you are using the XP Scaled templates, you will need a different version of this template, which you can grab from this gist on GitHub[2].
Create Settings Add-on Template
JavaScript Services requires at least Node.js 8.9.4 to render your application correctly, but by default web apps use an older version of Node.js that is not compatible. Fortunately, it's easy to set the version of Node.js that your web app uses with the WEBSITE_NODE_DEFAULT_VERSION environment variable.
At the time of this article, Node.js 8.11.1 is the highest version of node that you can use on a web app. To set this environment variable, we'll make yet another add-on template for holding settings for the CM web app.
You might wonder, why don't we just set this setting in the template above? That's definitely my preference, but when you set app settings or connection strings on a web app through an ARM template, all existing settings get wiped out. The Sitecore Azure Quickstart Templates configure a couple of app settings on the CM that we don't want to lose when we set the WEBSITE_NODE_DEFAULT_VERSION setting.
As a workaround, we'll create a separate settings add-on template that will be responsible for setting all app settings and/or connection strings on the CM web app. This will have the Sitecore Azure Quickstart Templates CM settings baked into it, so we don't need to worry about them getting wiped out. Any app settings or connection strings that you want to add to your CM web app should be done in this template until Microsoft adds the ability to set app settings and connection strings incrementally.
{
  "$schema": "http://schema.management.azure.com/schemas/2015-01-01/deploymentTemplate.json#",
  "contentVersion": "1.0.0.0",
  "variables": {
    "webApiVersion": "2016-08-01",

    "singleWebAppNameTidy": "[toLower(trim(parameters('singleWebAppName')))]",
    "defaultAppSettings": {
      "WEBSITE_LOAD_CERTIFICATES": "[parameters('authCertificateThumbprint')]",
      "WEBSITE_DYNAMIC_CACHE": 0
    },
    "mergedAppSettings": "[union(variables('defaultAppSettings'), parameters('appSettings'))]"
  },
  "parameters": {
    "standard": {
      "type": "secureObject",
      "defaultValue": {
        "infrastructure": {
          "authCertificateThumbprint": null
        },

        "deploymentId": null,
        "location": null,
        "singleWebAppName": null
      }
    },
    "extension": {
      "type": "secureObject",
      "defaultValue": {
        "authCertificateThumbprint": null,
        "appSettings": {},
        "connectionStrings": {}
      }
    },

    "deploymentId": {
      "type": "string",
      "defaultValue": "[coalesce(parameters('standard').deploymentId, resourceGroup().name)]"
    },
    "location": {
      "type": "string",
      "minLength": 1,
      "defaultValue": "[coalesce(parameters('standard').location, resourceGroup().location)]"
    },
    "singleWebAppName": {
      "type": "string",
      "minLength": 1,
      "defaultValue": "[coalesce(parameters('standard').singleWebAppName, concat(parameters('deploymentId'), '-single'))]"
    },
    "authCertificateThumbprint": {
      "type": "string",
      "minLength": 8,
      "defaultValue": "[parameters('standard').infrastructure.authCertificateThumbprint]"
    },
    "appSettings": {
      "type": "secureObject",
      "defaultValue": "[parameters('extension').appSettings]"
    },
    "connectionStrings": {
      "type": "secureObject",
      "defaultValue": "[parameters('extension').connectionStrings]"
    }
  },
  "resources": [
    {
      "type": "Microsoft.Web/sites",
      "name": "[variables('singleWebAppNameTidy')]",
      "apiVersion": "[variables('webApiVersion')]",
      "location": "[parameters('location')]",
      "properties": {},
      "resources": [
        {
          "type": "config",
          "name": "appsettings",
          "apiVersion": "[variables('webApiVersion')]",
          "properties": "[variables('mergedAppSettings')]",
          "dependsOn": [
            "[variables('singleWebAppNameTidy')]"
          ]
        },
        {
          "type": "config",
          "name": "connectionstrings",
          "apiVersion": "[variables('webApiVersion')]",
          "properties": "[parameters('connectionStrings')]",
          "dependsOn": [
            "[variables('singleWebAppNameTidy')]"
          ]
        }
      ]
    }
  ]
}
Note the defaultAppSettings variable at the top. This comes from the application nested template.
⚠️WARNING⚠️: If you are using the XP Scaled templates, you will need a different version of this template that supports both CM and CD web apps.
Upload the Add-on Templates to a Public URL
Upload the add-on templates to a public URL. I keep mine in a gist on GitHub. Make note of the URLs as you'll need them for the next section.
Integrate Add-on into azure.parameters.json
If you followed along with Pete "Sitecore Hacker" Navarra's guide, the next step is cake. Open up azure.parameters.json and add the following underneath the last parameter, inside of the parameters object:
"modules": {
  "value": {
    "items": [
        {
          "name": "settings",
          "templateLink": "<URL of the ARM template settings.json>",
          "parameters": {
            "appSettings": {
              "WEBSITE_NODE_DEFAULT_VERSION": "8.11.1"
            },
            "connectionStrings": {}
          }
        },
      {
        "name" : "jss",
        "templateLink" : "https://yourdomain.com/path/to/sitecore-module.json",
        "parameters" : {
          "msDeployPackageUrl": "<URL of the WDP file Sitecore JavaScript Services Tech Preview Server *.scwdp>"
        }
      },
      {
        "name": "bootloader",
        "templateLink": https://raw.githubusercontent.com/Sitecore/Sitecore-Azure-Quickstart-Templates/master/Sitecore 9.0.2/XP/addons/bootloader.json,
        "parameters": {
          "msDeployPackageUrl" : "<URL of the WDP file Sitecore.Cloud.Integration.Bootload.wdp.zip>"
        }
      }
    ]
  }
}
Again, make sure that you add modules inside of the parameters object otherwise your add-ons won't execute. Also note that the bootloader must always be last in modules.
- In the
settingsitem, update thetemplateLinkto the appropriate URL. - In the
jssitem, update thetemplateLinkandmsDeployPackageUrlto the appropriate URLs. - In the
bootloaderitem, you just need to update themsDeployPackageUrlparameter.
⚠️WARNING⚠️: If you are using the XP Scaled templates, your items will look slightly different. Have a look at this Gist[2:1]. Make sure to update the settings item appropriately as well.
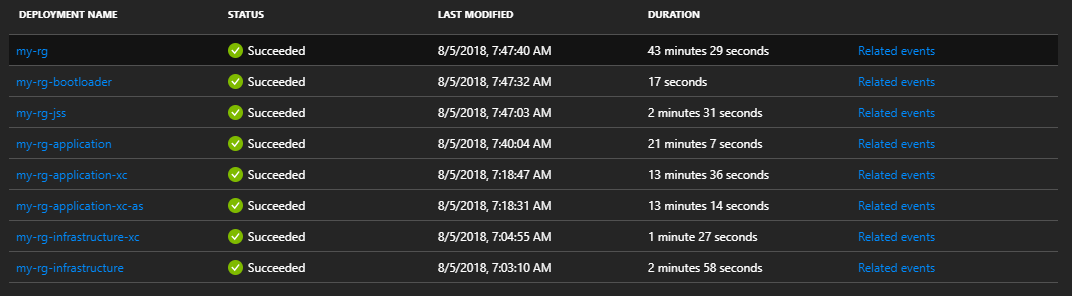
Run the Deployment
At this point, delete your resource group if it already exists and run the deployment. After it finishes, you'll have a new instance of Sitecore with JavaScript Services installed automatically! Each deployment takes roughly 45-60 minutes for me.
Create Import User
If you're not planning on using a code-first workflow with your Azure Web App, you can skip this section.
When you install the JavaScript Services package locally, Sitecore creates a JSS Import Service user for you. However, there's a bug in the ConvertTo-SCModuleWebDeployPackage commandlet where users aren't added to the WDP (roles are though). The default user that the JSS Import Service uses is a user called sitecore/JssImport. Log in to the Sitecore backend and create the following user in the User Manager:
- User name:
JssImport - Domain:
sitecore - Email:
no_reply@sitecore.net - Password:
areallylongpassword - Roles:
sitecore\JSS Import Service Users
Open the user editor and make the user an administrator. Close out of the Edit User form and then disable the account by clicking Disable in the ribbon.
After creating the user, you can hop over to the Role Manager and delete the sitecore\JssImport role (not the sitecore\JSS Import Service Users role!!!). This was supposed to be the import user, but ConvertTo-SCModuleWebDeployPackage turned it into a role instead.
If you don't create the user with the user name, domain, or role as specified above, you'll get an error like this when you attempt an import:
IMPORT ERROR(S) OCCURRED!
Exception thrown while importing JSS app
Exception: Sitecore.Exceptions.AccessDeniedException
Message: AddFromTemplate - Add access required (destination: {11111111-1111-1111-1111-111111111111}, template: {22222222-2222-2222-2222-222222222222})
Source: Sitecore.Kernel
Conclusion
All of the steps I've outlined above can be used to deploy other Sitecore modules to your Sitecore instances as part of your ARM templates. Installing SXA or SPE is as easy as grabbing the WDPs from https://dev.sitecore.net and creating new items in azure.parameters.json pointed to the WDPs on your storage account.
Hopefully when JSS goes gold master, a WDP will be provided alongside the regular packages so you won't have to go through the ceremony of creating the WDP yourself.
Let me know your thoughts in the comments.
For more details, read Sitecore MVP Bas Lijten's great write up on Sitecore Azure Toolkit and Cargo Payloads. ↩︎
Aside from testing the CD-specific WDP, I haven't done an XP Scaled deploy for JSS yet. If you find any issues, let me know in the comments so I can get the templates updated. ↩︎ ↩︎